Showing posts with label homemade. Show all posts

Tuesday, April 1, 2014

Fabulous, Light and Healthy Fish for Your Family


Many people who are looking for a healthier, less fattening form of protein to incorporate into their diet (that is NOT chicken) will likely enjoy halibut.  It is a large flatfish that swims sideways with the largest halibut recorded at more than 8 feet in length and weighing in at more than 500 pounds.  The picture below is provided by the Alaskan Department of Fish and Game.  It is kind of scary looking but I figure if you're going to eat it, you should know what it is and where it comes from! 


It is sold in thick white filets or steaks and doesn't taste fishy at all.  It has a denser, flakier texture than say tilapia, but is not as fishy or rich as salmon.  I'd say it's a nice in between fish.  

More than likely if you are eating enough calories in your diet, you are getting enough protein.  Most people are commonly deceived by fad diets or fitness articles into believing they need more protein than they actually need.  Because there is no protein storage "warehouse" in the body, any excess that is consumed is stored as fat. FAT, not muscle.  So the key to a healthful diet, whether vegan or otherwise, is to maintain a balance of calories in to equal the amount of energy you are expending (or energy out). I'm not a fan of counting calories by any stretch so I'd never really advocate that.  Rather, what I'm trying to explain is where fish like halibut might fit into your diet.  If you are just trying to get more bang for each bite you take-ie the most nutrition with the least amount of negative stuff-choosing fish over steak might be a nice option for you.  Of course things like quinoa are always an option for vegans and vegetarians, but omnivores I'm talking to you! 

Here's the breakdown of what a 3 oz portion of halibut might look like nutrition-wise if prepared using the recipe I'll provide below (sorry it's blurry):

Note that it's about 178 calories with about 1 gram of saturated fat.  Steak cooked in a similar fashion would have about 284 calories with about 8 grams of saturated fat.  

These small changes, collectively, over the days, weeks and months, can add up to big differences in your health.  Fat is not bad! I actually am not a proponent of Fat Free products or alternative fats because of all the added preservatives, sugars and salts used to replace flavor in those products.  I also believe that minimizing saturated fats can help you maintain or lose weight and prevent many modern diseases like heart disease, type 2 diabetes and more (supported by scientific data not listed here-y'all are smart, you can find it everywhere!). In this meal alone, swapping red meat for fish saves you 7 grams of sat fat!!! Woah!

So with all that said I'm going to give you a recipe for Halibut Cacciatore that was used in my Food Production class at school, but with a few changes I've made to amp it up a bit.  Hope you enjoy!

Ingredients  Serves 2

8 oz Alaskan Halibut cut into 1 inch chunks
Flour for dredging
2 Tbsp canola oil (measure this out! it makes a difference calorie-wise)
1 medium onion, chopped
1 green pepper, chopped
1 garlic clove, crushed
4 oz of mushrooms, chopped (or about a third of a 12 oz container)
1 8 oz can of organic canned tomatoes (with the juice)
1 tsp oregano
Salt and pepper to taste
1/2 pkg of angel hair pasta

Method

1. Dredge fish in flour and heat 1 tablespoon oil in sauté pan. When oil is hot, sauté fish in pan until browned (about 2 minutes max). I just flipped the pieces once or twice. Set aside. Don't worry if they cool, you will be reheating them to finish cooking in a few steps.

2. Get some water boiling for the pasta.

3. Add 1 more tablespoon of oil to the pan.  Saute onion, pepper, garlic and mushrooms in the pan for a minute or two. Then add oregano (and a few red chili flakes if you like!) and tomatoes and season on a low simmer for about 10 minutes.

4. After you start this simmering, drop your pasta and cook until al dente or for about 4-5 minutes. Drain and put on serving plate.

5. Add fish to sauce mixture, cover and simmer for about 5 more minutes until fish is cooked through (145 degrees) and flaky.

6. Once fish is done, toss pasta in sauce and pour into serving dish. Enjoy!!!

Thursday, March 27, 2014

Thinking of Eating More Veggies or Ditching Dairy Altogether? Here's how to start!

Ways to Jump-Start Your Vegetarian or Vegan Eating Habits


Eating healthy doesn't always have to involve cutting out FLAVOR from your diet, while cutting out meat and/or dairy.  The above dishes are completely vegan (no meat or dairy/eggs) and no oil!  We were able to make those cheaply, quickly and most of all tastefully using some great tips I'd like to share.  

There are a million books on the subject, so if you'd like to take the time I'd read any written by Dr. Joel Fuhrman, Dr. Caldwell Esselstyn, Rip Esselstyn, Dr. Neal Barnard and Dr. T. Colin Campbell.  
Rip Esselstyn and I at my "Forks Over Knives" pre-screen
All are amazing inspirations with backgrounds and science to support their health claims.  If you don't have the time to read those books, or want to supplement their info, this blog post is for you.  I get countless requests for help on how to transition a family's diet over to one that minimizes or eliminates meat and/or dairy.  So I've put together a "starter kit" to help you all navigate through the first few weeks.  They are undoubtedly the hardest, but you can do it, and it is absolutely worth it.

On a side note-if you are wanting to know more about why we are cutting meat and/or dairy out of our diets for health, that is in a different blog post and also in my "Basics…" section, along with a book called "The China Study."  Please see any of those places to get a better understanding of why making these changes will optimize your health.

Revamp Your Kitchen and Pantry

Changing foods means changing gears, literally sometimes.  If you don't have the proper tools to help you cut or prep veggies and execute recipes, you are going to be one miserable and HUNGRY person.  So let's make sure you have the essentials.  And PS, this may sound like it will cost you a fortune, but you will actually SAVE MONEY once you transition into your new lifestyle because you'll be buying in bulk and eating lots of yummy leftovers.

For actual appliances and cookware you'll need the following:

-Blender, preferably a really great one like a Vitamix
-Food processor, or food chopper
-Sharp knives
-Peeler
-Colander
-Good pots and pans

Now let's tackle your pantry. I spent countless hours developing this stuff for Whole Foods Market when I worked there as a Healthy Eating Specialist.  I'd be silly not to utilize those amazing resources we created.  So here is a link to an amazing website with a lot of the info I'm giving you below, and much more.

Pantry/Freezer Staples:

-A variety of cans of no-salt-added, BPA-free beans.  I love Eden Organic and usually stock pinto, garbanzo, kidney, black and navy beans.
-Whole grains stored in glass jars.  So buy a package of each of the following: old fashioned oats, quinoa, brown rice and barley.
-Whole wheat pasta. Always just keep a pound or two on hand.
-Whole wheat tortillas.
-Ground flaxseed. Store in fridge so they stay good longer.
-Canned Tomatoes. It sucks because these are a necessity but it's hard to find them without BPA in the can and tomatoes are particularly susceptible for absorption.  Go organic and do the best you can here, but I usually buy at least two big cans.
-Low-sodium vegetable broth. You really can't have enough. I usually get a package of the little 1-cup containers as well as a few bit containers.
-Almond milk.  A couple of boxes of unsweetened almond milk will work wonders for you and is better than soy and rice milk nutritionally because it has more absorbable calcium and won't contain arsenic (rice) or nutrients that turn into estrogen in your body (soy).
-Tahini. This is just ground sesame seeds and is amazing for making homemade hummus and adding flavor to things.
-Peanut Butter. Unsalted. A few jars kept in the pantry, not fridge please.
-Nutritional yeast.  They are yellow flakes that are made from yeast and they taste and look like cheese when cooked! Yum! Find them in the bulk section or the organic section of your supermarket.
-Raw nuts. Unsalted, roasted if you want.  I usually get cashews, almonds, pistachios and macadamia nuts.
-Dried apricots, dates and raisins. Un-sulfered and unsweetened.
-Dijon mustard.
-Salsa. A great, flavorful one.
-Soy sauce. Low sodium.
-Frozen hash browns. Unsalted.
-Frozen fruit. Unsweetened organic. Get whatever you like!
-Frozen spinach.
-Spices. Freshen up those spices that have been sitting in your kitchen for a decade. Seriously.  Get some new ones like ground mustard, paprika, cayenne, cumin, black pepper, rosemary, thyme…you get the picture.

Ok I'm sure I probably left out some things but these are items you always want to have on hand in addition to the fresh veggies and fruits you'll be buying regularly.  Now you may need to shop more to keep fresh produce in your house, but you'll be spending less because you'll only be buying a few items each time, rather than doing big shops. Make sense?

Now that we've got your kitchen set up it's time to change out those same seven recipes you cycle through (you are not alone!) each week to healthier options.  I'm posting a few go-to breakfasts, lunches and dinners that I use that will make your new eating habits not only healthy, but quick and easy. Most of the recipes are linked below but if not, I'll post them in future blogs! All recipes are vegan because I figure if you are not vegan, you will just add cheese or meat to the recipe where you want to.

Basic Breakfast Recipes-Click here for a week-long guide I posted a while ago


Breakfast Burrito
Oatmeal
Pancakes
Vegan French Toast
Cereal with Fruit
Whole Wheat Toast with Nut Butter

Lunch Recipes

Tomato/Avocado Sandwich
Soup and Salad
PBJ
Veggie Sushi
Chili

Dinner Recipes


Veggie Stir-fry
Pasta with Veggies
Vegan Stuffed Shells
Veggie Paella
Quinoa Tacos
Vegan Lentil Burgers 

I gave quite a few links and recipes to try above.  Please let me know your thoughts, questions and challenges. I hope this helps!

Friday, February 14, 2014

Clear Out Your Cupboards Chili!

Simple Pantry Chili!
As we all continue to hibernate (or many of us anyway), I thought it might be nice to post a standard chili recipe (there is a great butternut squash/kale recipe in a recent previous post) that you can make without leaving your home AND that's packed with IRON, FIBER, PROTEIN, CALCIUM and tons of other vitamins and minerals.  It's also made in one pot, with about 5 minutes of prep and little babysitting! I was able to fold the laundry while this cooked.  And if you still needed another reason to make this-it tastes even better then next day! 

Ingredients (and remember use what's in your pantry-substitute where necessary)

1 onion, diced
2 small sweet peppers, diced
1 can unsalted kidney beans (drained and rinsed)
1 can unsalted black beans (drained and rinsed)
1 can unsalted navy beans (drained and rinsed)
1 14 oz can of organic crushed tomatoes (i used fire roasted)
1 lb ground organic beef (can be left out-i just had some on hand)
2 Tbsp chili powder
pinch of cinnamon
pinch of cumin
pinch of garlic powder

Method

Heat a little olive oil in a large saucepan (like a tsp) and add the onions, peppers and spices.  Saute for a few minutes until translucent, then add beef.  Saute on medium until browned.  Add beans and can of tomatoes and bring to a boil.  Reduce heat to low and simmer for 20-30 mins covered. DONE!

I added hand-grated cheddar cheese because my son loves it, but feel free to leave out both the meat and cheese for a vegan delight! You can add avocado instead! 

Hope you enjoy this great weeknight meal!

Use the leftovers to make fantastic breakfast burritos or as a topper for nachos at snack time!

Saturday, September 28, 2013

Surprisingly Awesome Cauliflower Salad


I got a HUGE head of cauliflower in my CSA (community supported agriculture) this week and was getting sick of just adding it to mashed potatoes.  So I looked for a new way to incorporate this cancer-fighting cruciferous vegetable into my daily diet!  Below is the inexpensive, easy way to do so.  I know many are afraid of raw cauliflower, but it really is an amazing, balanced salad! Give it a try!

Recipe source: epicurious.com

Ingredients

1/3 cup olive oil
1 tsp fresh rosemary, minced
2 Tbsp FRESH lemon juice
1 Tbsp red wine vinegar
2 1/2 tsp lemon zest
salt and pepper
1 head cauliflower, trimmed and cut into small florets
1 (15 oz) can of unsalted navy beans, drained and rinsed
2 heads of Belgian endive, trimmed, halved lengthwise and then thinly sliced crosswise
1 Tbsp FRESH chives, chopped
2 tsp FRESH parsley, chopped
1/2 cup crumbled feta cheese (3 oz)

Directions

Infuse the olive oil with the rosemary by stirring it over medium heat for about a minute or until fragrant. Set aside and let cool.

Whisk lemon juice and zest, vinegar and salt and pepper in a bowl and set aside.

Combine cauliflower, beans, endive, chives, parsley, and rosemary oil in a bowl and toss.  Then mix in the cheese and toss again.  Then add the lemon mixture and toss one last time. Serve.

Cauliflower Stats! (sourced from whfoods.com, one of my fav sites)

Ignoring the amazing nutrition of the other ingredients in this salad, ie protein from beans and vitamins from endive, cauliflower (especially raw) has a ton to offer you besides fiber to keep you regular.  Here's a look:

vitamin C 85% of your daily value!
vitamin K 20%
folate 15%
choline 11%
vitamin b6 10%
potassium 9%

And for very few calories! Cauliflower in and of itself only has 26 calories!! Wow! Enjoy!

Saturday, September 21, 2013

Pancake Perfection!

Again, I'm featuring a breakfast food because, well, it's my favorite meal of the day AND I also wanted to show you that there are tons of different ways to eat a healthy breakfast.  Today I'm talking about pancakes.  I typically hate pancakes.  The pancakes I remember eating at restaurants as a kid were doughy, sugary, artificial tasting and covered in syrup that also tasted artificial.  Sound familiar to anyone?  Not tasty and CERTAINLY not healthy.  

In this post I offer you a quick, inexpensive and healthy alternative to the infamous pancake.  First, the dough.  I'm posting two pics of the pancake mix I used, one of the package and one of the ingredients.  We'll go over both.

I like Nature's Path Multigrain because they do the best they can at using the best ingredients.  It is not only ORGANIC but also NON-GMO certified, which these days is very important.
So the ingredients...Overall, I'd rate them about a B on the A to F scale.  I love that they use whole wheat flour but am not too thrilled about the cane juice, whey powder or monocalcium phosphate (which is added calcium and phosphorus for leavening).  The sodium bicarbonate is just baking soda. So besides making the batter yourself-with whole wheat flour, this is the next best option in my book!
So the instructions are simple: 

Again, I stole this picture because my son ate the pancakes I made before I could snap a pic. I'll do better next time! Thanks cheekykitchen.com!

Ingredients

Pancake mix
Canola oil
Ripe banana
Slivered almonds (raw, unsalted)
Carob chips (or chocolate chips if you want, I just went with a vegan option)
Shredded coconut (unsweetened)
Vanilla extract

Options: any other random fruits or items you like to eat. peanut butter might be good in there as well!

Directions:

Follow instructions to make the basic batter. I believe it's 1/2 cup of dry mix to 1 3/4 cup of cold water plus 2 tbsp canola oil-but I may be wrong so just check.  It's super easy and I usually double it for my batches.

To the bowl with the batter, add all the rest of the stuff.  Stir it until mixed well and banana is all mushed up in there.

Spray a non-stick pan with cooking spray or use butter or whatever you like to grease it up.  Use a spoon to dollup the mix in there and DON'T TOUCH THEM until the sides are bubbley.  Then it's ok to flip.  The other side cooks quick so have a plate ready.  I would regrease pan before next batch.

Once they're done I just serve them up as is. No frills, no anything needed.  Fresh berries would be a great side or maybe some added coconut, but really they can stand alone.  That is why I love them!

Friday, September 13, 2013

Build a Better Breakfast!

I'm constantly being told by a wide variety of folks that there isn't enough time to make a healthy, wholesome breakfast.  Sometimes that can be the case; most times I would disagree. Here's how to make a quick, healthy breakfast for you and your family that's tastier than anything packaged and will cost you a fraction of what you'd pay at the store.  

My go-to simple breakfast is oatmeal!  I'll give you the recipe in a second, but first I want to show you why getting those microwavable oatmeal pouches isn't the best option. They are pricey, and have some yuckiness inside.  See below.

Here's a look at the product I'm referencing. I used to eat something like this as a kid.   

Focus here not on the nutrition label, but on the ingredients. THAT is the secret to picking healthier processed foods. By looking at the product's ingredients I see that it has salt, artificial stuff and little nutritional value other than the oats themselves.
So in the grand scheme of things this product isn't horrible.  It is cholesterol free, fast-cooking (like 60 seconds in microwave) and a whole grain. BUT it costs $3 for one pouch!!! Woah. I don't know about you but feeding a family can be pretty costly and I can't afford to spend $9 for just oatmeal for my three family members.  Instead, I'll offer you my nutritious, inexpensive fix for this issue!

Totally not my pic, I forgot to take one this morning so thank you google for sharing this with me. You guys get the idea.
Recipe:

Ingredients

1 cup Uncle Bob's Rolled Oats
2 cups water 
1 box (or if you have these in your pantry-a scoop) raisins
cinnamon
fruit
1 tbsp ground flax
1 scoop walnuts

Optional add-ons include: chopped dates, coconut, carob chips, almond milk, etc. etc.

Directions

Add oats and water to a saucepan and bring to a boil. Add everything else. 

Then lower to simmer, stirring frequently, for about 5-10 minutes.

Serve. 

Super easy and bulk oats cost about $.89/lb. YUP, per POUND! So if you're like me and have the rest of the stuff in the pantry, you can use local/seasonal fruit and this dish will cost you at most $1, while providing you a nutritious breakfast.

More specifically:

~Oats provide long-lasting energy and stable blood sugar for hours!
~This is a cholesterol-free, dairy-free meal which means it contains only the good fats, and has very little sodium.
~By using fruit, unlike the packaged kind, you add flavor and sweetness that enhances taste and packs a nutritious punch.
~Using flax and walnuts provide the necessary omega-3 fatty acids needed to maintain balance and to fight inflammation in our system. 

This recipe is really just a base for you to use your imagination! Have fun and let your kids help. You'll be surprised and how awesome this simple grain can taste!

Friday, February 25, 2011

Snowy Day Recipe for You AND Your Kids! (or just you)

On snowy days like today, you can fight off boredom, give your kids an interactive and fun activity AND enjoy a tasty treat that will last you days with the following recipe.
They are Homemade and Healthy Granola Bars that use only the ingredients pictured here. That's it!!! I didn't even have to run to the store! I had this all in the pantry so it cost me NOTHING! If you were to buy these ingredients, it'd probably cost you about $10, but it would give you ingredients to make several other things or several batches of granola bars!
These are way cheaper, healthier and tastier than store-bought bars. Here's how you do it. Oh and **PARENTS** please let your kids do this. They can and should get their hands dirty with this recipe! Also, this is just a base recipe-make it your own. Mix in things you love to enhance and change it to keep it interesting!
Ingredients

2 ripe bananas-use what you've got, but they need to be soft so they can be mushed
2 cups of old fashioned oats-they can be rolled or steel cut JUST NOT QUICK
shredded coconut
dates, pitted and chopped
vegan chocolate chips (or if you dig regular ones use regular)
walnuts, chopped
cinnamon
nutmeg
***Notice there is no sugar added to this recipe!! This means you and your family can enjoy the natural sugars found in the real fruits used for these bars. Refined sugars are bad because they cause blood sugar level spikes that can make you tired and hungry faster, when you actually aren't. They also offer little value nutrition-wise but cause you to pack on pounds. With fruit, you get the natural sugars packed with nutrients AND fiber which allows you to feel full, absorb the nutrients and flush out (pun intended!) the toxins in your body. Win-win here!***
The above picture is of pitted dates. You find fresh dates in the produce section of your grocery store. They are a fruit, so they come with pits. Make sure they are somewhat soft to the touch when you buy them because then they are more easily incorporated. These will be your most expensive ingredient. If you don't want to use them-simply substitute a little applesauce (with no added sugars or weird things in the ingredients) to keep the sweetness up. Dates are great for any recipe, smoothie, whatever, where you need to add sweet flavor without sugar! In my eyes, a pantry staple!

Method
Preheat your oven to 350 degrees.

Put all ingredients in a large bowl. Mix them up, by hand, until all the oats are coated with the banana. It should be a mushy, wet-ish mixture. See below.
Then spread into a casserole dish that you would use for something like brownies. You'll spread them in the pan as you would brownies too-flat and even and covering the bottom.

Pop in the oven for about 30 minutes. The cool thing with this recipe is that there is not raw meat or dairy in it so LET YOUR KIDS LICK THEIR FINGERS! Let them eat some of the "batter" if they want. These bars only need to cook to keep them together so just when you start smelling them, check on them and they can probably come out. Mine were done today in about 20 minutes. It just depends on how thick you make them. Also note, in the picture to the right, how much cleanup work this recipe takes. WOW, washing that one bowl and spatula is going to be tough. LOL.

This is a no brainer! Once the bars come out-let them cool for about 5 minutes so they are more easily cut. But if you can't wait-go at it-they just won't be pretty. This recipe takes only 10 minutes of active work, which you can draw out with your kids if you want-but then the rest is oven time. Awesome huh?

And just for kicks-let's analyze a popular granola bar favorite that appears to be healthy shall we? Yes.


Ok so forget the Nutrition "Facts" for now because I haven't been able to chat with you about how to read that yet and let's focus on the ingredients.

The first ingredient is great-oats. Ok, then...well, sugar. Not good. Then, canola oil-a fatty, nutrient-less food. Then, corn flour-a binder perhaps? Unecessary and certainly void of nutrients because of how processed it is. Then, OH LOOK, more sugar-this time it's brown which means the white sugar was mixed with molasses.
Still no nutrients or flavor-just sugar.
At this point you can stop hoping for some type of real food ingredient because the top 3 to 5 ingredients are the ones that count-they are the ones that make up most of the food. And as we can see here, these "granola bars" are just sugar in bar form. Lovely.
Instead-how about feeding your body and your kids' bodies something nutritious that was made at home and is packed with real food like oats, bananas and dates. Worth it? Yes.

Monday, February 21, 2011

When You're Hungry for a Snack...

On a day where you don't feel like leaving the house (in my case because of my snow) and you are having people over, or you just plain need a healthy snack, you can still create this pretty, yummy and nutritious treat for cheap!

I also bring this to parties a lot because it looks a whole lot better than just bringing a plate of veggies with some hummus. The picture to the left is actually from one of my Healthy Eating Supper Clubs that I hosted at Whole Foods Market in Fort Collins, CO. I served this, to rave reviews, as an appetizer. The recipe is as follows:

Ingredients

1 english cucumber
1 package of oil-free roasted red pepper hummus (or if you can't find it, make it yourself with recipe below!)
1 cup of raw cashews (toasted if you are feeling ambitious!)

NO JOKE THAT'S IT! I'll tell you how to assemble below and will also give you my recipe for homemade hummus that's to die for, in case you want to keep the "homemade and healthy" thing going on. I highly encourage this because then you can make your hummus without oil.
Method

Wash the english cucumber and cut off the ends. Then peel the cucumber so the skin looks like stripes! Slice into 1/2 or 1/4 inch rounds and spread on a plate. Spoon a heap of roasted red pepper hummus on top of the cucumber slice and garnish with a cashew. Serve! This yummy dish is fresh, healthy and balanced with all the components that make a dish taste great! Try for yourself!

WHY skip the oil?


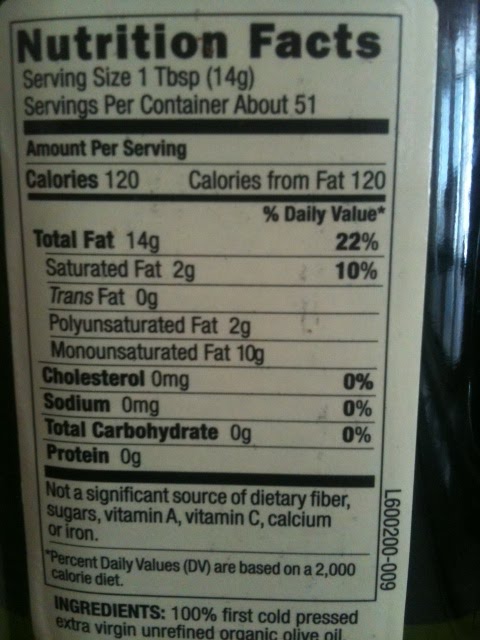
Because if you look at the label here for Spectrum Olive Oil (it will be pretty much the same label for any olive oil you get), you'll notice that the serving size is only 1 TABLESPOON, and that in that one tablespoon there are 120 calories-all from fat!!! So if you are adding, say 1/4 cup of olive oil to your hummus-that's about 4 tablespoons equalling 480 calories all from fat!!! And you don't even feel full from those calories!


People will argue back and forth about the potential health benefits of olive oil. I'm not here to talk about that. Whatever you believe-fine. HOWEVER-no one can disupte that olive oil is 100% fat and if you are trying to lose weight or be healthier, it is not ideal because again you will be getting calories that won't fill you up. Instead I recommend ditching the calories and getting your fats from whole plant sources (not the extracted ones in this case) to fill you up with nutrients, fiber and the like. You'll see a real difference once you stop cooking like Rachael Ray and Paula Deen. Really! It can be simple if you let it be.

Homemade and Healthy Hummus (no oil in this recipe!)


Ingredients

1 can no-salt-added garbanzo beans, drained and rinsed-some of the liquid reserved
lemon juice (from a real lemon, not that funny lemon-shaped squeezie bottle)
1 tbsp horseradish (the kind from the store that doesn't have preservatives)
2 tbsp tahini (which is just crushed sesame seeds-good, healthy fat)
fresh ground pepper
dash of low sodium tamari
dash of cayenne
dash of cumin
dash of paprika
dash of coriander
(add a few roasted red peppers from a jar if you are making the hummus for the dish above)

Directions

Blend all ingredients to taste. You can used the reserved bean liquid to thin out the mixture with flavor (to replace the oil). Remember, taste along the way. Add more spice if it needs it. Enjoy!

Saturday, February 19, 2011

How About Some Vegan Stuffed Shells?


This recipes comes from my need for comfort food! Especially on a day like today in Upstate New York where it's snowy and gray-you really want to feel the warmth in your home, belly and heart. So why should you have to sacrifice your health and waistline?!

I came up with this Vegan Stuffed Shell recipe to satisfy that particular issue. Hope you enjoy and would love to hear what you think!

Ingredients

For the shells:
1 box of large whole wheat pasta shells or whole wheat lasagna noodles if you can't find the shells or brown rice lasagna noodles if you are gluten-free
2 cups macedemia nuts
2 cups cashews
2 Tbsp nutritional yeast (you can find this in the bulk section of your grocery store and it is just yeast but looks and tastes like cheese when added to things!)
1 can of artichoke hearts, drained and diced
dried basil
dried oregano
black pepper

For the sauce (OR buy a low-sodium sauce instead):
2 or 3 cans of no-salt-added diced tomatoes
red wine-something you like
onions, diced
garlic, minced
red pepper flakes
dried basil

Directions

**Do ahead**
Put macademia nuts in a bowl filled with water about an inch above the top of the nuts and let soak overnight (before you go to bed) or for 8 hours (while you are at work).

Put cashews in a separate bowl filled with water about an inch above the top of the nuts and let soak overnight or for 8 hours.

**At Supper Time**
After the nuts have been soaked, drain them and blend them in a high powered blender separately. The macademia nuts should resemble a ricotta cheese when blended. Add water or lemon juice to keep your blender from overheating and to get the right consistency. Then once complete, throw in a bowl. Do the same for the cashews and throw in the same bowl.

Now add the basil, oregano, pepper, yeast and artichokes until well mixed. I didn't put amounts for the spices because you should taste it to see what you like. Add small amounts at first, mix, then taste. If it doesn't taste flavorful yet, add more spice because it certain won't change while baking!!

Then cook the shells or noodles in a pot of water until al dente, about 4 to 6 minutes. Drain, separate and lay flat to cool. Stuff with the "cheese" mixture and set aside. (If you are using lasagna noodles just dollup a little "cheese" in the middle of the noodle and roll it up!)

Preheat oven to 350 degrees.

To make the sauce, heat your onions in a hot stainless steel skilled. You don't need oil if the pan is hot enough because the onions will release their own juices! Saute for about 2 minutes, then add the garlic, red pepper flakes, basil and other spices you might like! Saute for 1 minute and add a bit of red wine to deglaze the pan. Then add the tomatoes and simmer for about 10 to 15 minutes until the sauce thickens and reduces.

Spread a little of the sauce to coat the bottom of a cassorole dish. Then add the stuffed shells (or the rolls) to the dish. Then coat with another layer of sauce, making sure each shell is covered. Throw in the oven for about 40 minutes and serve. YUM!